Category Archives: Tools

The Case of the Overly Busy Process

The other day, I was running a routine Process Monitor (Procmon) trace to debug an issue in Keyman, when I noticed something strange: over 50% of the events displayed with the default filter (which excludes a lot of system-level noise and procmon-related feedback) were coming from a single process: services.exe.

You can see in the image below I’ve added services.exe to the filter (Process Name is services.exe), and then the status bar shows 52% of events belonging to it.

Puzzled, I set aside some time to dig a little further (which means I went to bed late one evening). Watching Process Explorer, I could see that services.exe and wmiprvse.exe were between them consuming about 10% of my CPU. This did not seem normal. Nor did it seem to be a good thing for my battery life.

Deciding to examine the trace a little, I filtered out common registry keys and events, such as RegCloseKey, which made it easier to spot a pattern. It became obvious that every 5 seconds, services.exe, with the help of wmiprvse.exe, would enumerate the list of services from the registry, sending about 120,000 events to the Procmon trace in the process. Nearly 80% of the events captured each minute by Procmon were generated by either services.exe or wmiprvse.exe!

Nearly 80% of the events captured each minute by Procmon were generated by either services.exe or wmiprvse.exe!

Given that wmiprvse.exe, the Windows Management Instrumentation (WMI) provider host, was involved, it seemed likely that there was a process issuing WMI queries against the Services provider, such as you can do with PowerShell:

Get-WmiObject Win32_Service | Format-Table Name, DisplayName, State, StartMode, StartName

It was just a matter of figuring out which one.

I started off by trying to dig into WMI logging. I don’t know if you’ve ever dug into that, but it’s huge, complex and somewhat impenetrable. It is likely that with the right knowledge I could have issued a command that gave me a list of queries being issued and who was issuing them. But I have not yet acquired that knowledge, sadly, and late at night my brain did not feel up to the attempt.

It seemed easier to instead to use a process of elimination of processes (yeah, I did that on purpose). I started the CPU monitor in Process Explorer for the services.exe process, which showed lovely 5 second spikes.

Then I started to stop various services, watching to see if the spiking stopped. It didn’t. Once I was down to a handful of critical services (do I really need to run the Firewall service?) I started looking at background user-level processes, such as the icons sitting in the System Notification Area.

And here I hit gold. After shutting down a few, including my own programs, with no noticeable change, I shutdown MySQL Notifier 1.1.7.

All of a sudden, CPU activity dropped to zero on the services.exe process, and the next Procmon trace showed a mere 85 events in a minute for the services.exe and wmiprvse.exe pair.

Success!

I checked the MySQL Notifier forums and saw no discussion of this issue, but I found a closed bug report in the bug database. I’ll have to add my comment to the bug report.

Once again, Procmon comes to the rescue 🙂 I’m looking forward to the increased battery life already!

I know it’s not the most elegant way to debug a problem, but sometimes it is quicker and easier than the alternatives. It’s especially easy to use process of elimination like this late at night, without having to think hard about it. 😉

Let’s Encrypt on Windows, redux

Jan 2020, please note: This approach is now deprecated. Let’s Encrypt will stop accepting ACMEv1 requests in June 2020. Have a look at https://letsencrypt.org/docs/client-options/ for alternatives to this process.

A couple of months ago I wrote a script to automatically renew Let’s Encrypt certificates in PowerShell on Windows. The renewal process works really well, however, there is one wrinkle that I did not cover. In this blog post I smooth out that wrinkle!

The wrinkle

When it came time to renew my certificate, a few days ago (well within the 90 day limit for the certificate, mind you), I discovered that the identifier for the certificate had expired. Why was this a problem? Well, I had originally used a manual DNS challenge to validate the identifier with Let’s Encrypt. This worked fine, but of course, manually creating a new identifier and challenge every 90 days completely undoes the benefit of automatic certificate renewal.

Smoothing out the wrinkle

In order to resolve this, I needed to automatically generate and validate an identifier at the same time as I generated a new certificate. The only automatic challenge provider at this time with ACMESharp is the http-01 provider with the IIS handler.

So I updated the script to generate the identifier automatically and validate with the http-01 challenge provider. However, the http-01 challenge provider requires a HTTP request, not a HTTPS request, to the hostname in question, because, and I quote the IETF draft here:

… Because many webservers allocate a default HTTPS virtual host to a particular low-privilege tenant user in a subtle and non-intuitive manner, the challenge must be completed over HTTP, not HTTPS.

I love subtle and non-intuitive computing!

But this was a problem for me, because the secure site I was working on did not have a http endpoint, only a https endpoint, which is the whole reason I used a DNS challenge in the first place.

I finally threw in the towel and I decided to setup a http endpoint, and configure automatic redirection to https (yes, I could go further here). You may find you need to setup an exception for automatic redirection for the .well-known/ root folder (where http challenges are kept as static files). I’ll leave that tweak for you to figure out (it’s just another line or two in your site root web.config).

A deeper wrinkle

The wrinkles get a little deeper, when you look at what happens if you already have a valid challenge response for an identifier. This could happen if you had manually validated another alias for the same identifier using e.g. dns, as I had in the past, or if you are renewing before your existing identifier expires. Because the challenge responses are matched to the hostname, and not the aliases, the previously valid responses continue to be acceptable. In this situation, the existing challenge response was used by the Let’s Encrypt server, and it never checked my shiny new web server challenge endpoint. This meant we needed to see if any existing challenge responses were considered valid, rather than relying on checking the challenge we’d just setup. The script changes handle this scenario.

Just read me the script

The full PowerShell script is shown below; the changes begin at the start of the Try block, and finish after the New-ACMECertificate call. More detail on how the script works is provided in the previous blog post.

import-module ACMESharp

#
# Script parameters
#

$domain = "my.example.com"
$iissitename = "my.example.com"
$certname = "my.example.com-$(get-date -format yyyy-MM-dd--HH-mm)"

#
# Environmental variables
#

$PSEmailServer = "localhost"
$LocalEmailAddress = "[email protected]"
$OwnerEmailAddress = "[email protected]"
$pfxfile = "c:\Admin\Certs\$certname.pfx"
$CertificatePassword = "PASSWORD!"

#
# Script setup - should be no need to change things below this point
#

$ErrorActionPreference = "Stop"
$EmailLog = @()

#
# Utility functions
#

function Write-Log {
  Write-Host $args[0]
  $script:EmailLog  += $args[0]
}

Try {
  Write-Log "Generating a new identifier for $domain"
  New-ACMEIdentifier -Dns $domain -Alias $certname
  
  Write-Log "Completing a challenge via http"
  Complete-ACMEChallenge $certname -ChallengeType http-01 -Handler iis -HandlerParameters @{ WebSiteRef = $iissitename }
  
  Write-Log "Submitting the challenge"
  Submit-ACMEChallenge $certname -ChallengeType http-01
  
  # Check the status of the identifier every 6 seconds until we have an answer; fail after a minute
  $i = 0
  do {
    $identinfo = (Update-ACMEIdentifier $certname -ChallengeType http-01).Challenges | Where-Object {$_.Status -eq "valid"}
    if($identinfo -eq $null) {
      Start-Sleep 6
      $i++
    }
  } until($identinfo -ne $null -or $i -gt 10)

  if($identinfo -eq $null) {
    Write-Log "We did not receive a completed identifier after 60 seconds"
    $Body = $EmailLog | out-string
    Send-MailMessage -SmtpServer $PSEmailServer -From $LocalEmailAddress -To $OwnerEmailAddress -Subject "Attempting to renew Let's Encrypt certificate for $domain" -Body $Body
    Exit
  }
  
  # We now have a new identifier... so, let's create a certificate
  Write-Log "Attempting to renew Let's Encrypt certificate for $domain"

  # Generate a certificate
  Write-Log "Generating certificate for $domain"
  New-ACMECertificate $certname -Generate -Alias $certname

  # Submit the certificate
  Submit-ACMECertificate $certname

  # Check the status of the certificate every 6 seconds until we have an answer; fail after a minute
  $i = 0
  do {
    $certinfo = Update-AcmeCertificate $certname
    if($certinfo.SerialNumber -eq "") {
      Start-Sleep 6
      $i++
    }
  } until($certinfo.SerialNumber -ne "" -or $i -gt 10)

  if($i -gt 10) {
    Write-Log "We did not receive a completed certificate after 60 seconds"
    $Body = $EmailLog | out-string
    Send-MailMessage -SmtpServer $PSEmailServer -From $LocalEmailAddress -To $OwnerEmailAddress -Subject "Attempting to renew Let's Encrypt certificate for $domain" -Body $Body
    Exit
  }

  # Export Certificate to PFX file
  Get-ACMECertificate $certname -ExportPkcs12 $pfxfile -CertificatePassword $CertificatePassword

  # Import the certificate to the local machine certificate store 
  Write-Log "Import pfx certificate $pfxfile"
  $certRootStore = "LocalMachine"
  $certStore = "My"
  $pfx = New-Object System.Security.Cryptography.X509Certificates.X509Certificate2
  $pfx.Import($pfxfile,$CertificatePassword,"Exportable,PersistKeySet,MachineKeySet") 
  $store = New-Object System.Security.Cryptography.X509Certificates.X509Store($certStore,$certRootStore) 
  $store.Open('ReadWrite')
  $store.Add($pfx) 
  $store.Close() 
  $certThumbprint = $pfx.Thumbprint

  # Bind the certificate to the requested IIS site (all https bindings)
  Write-Log "Bind certificate with Thumbprint $certThumbprint"
  $obj = get-webconfiguration "//sites/site[@name='$iissitename']"
  for($i = 0; $i -lt $obj.bindings.Collection.Length; $i++) {
    $binding = $obj.bindings.Collection[$i]
    if($binding.protocol -eq "https") {
      $method = $binding.Methods["AddSslCertificate"]
      $methodInstance = $method.CreateInstance()
      $methodInstance.Input.SetAttributeValue("certificateHash", $certThumbprint)
      $methodInstance.Input.SetAttributeValue("certificateStoreName", $certStore)
      $methodInstance.Execute()
    }
  }

  # Remove expired LetsEncrypt certificates for this domain
  Write-Log "Remove old certificates"
  $certRootStore = "LocalMachine"
  $certStore = "My"
  $date = Get-Date
  $store = New-Object System.Security.Cryptography.X509Certificates.X509Store($certStore,$certRootStore) 
  $store.Open('ReadWrite')
  foreach($cert in $store.Certificates) {
    if($cert.Subject -eq "CN=$domain" -And $cert.Issuer.Contains("Let's Encrypt") -And $cert.Thumbprint -ne $certThumbprint) {
      Write-Log "Removing certificate $($cert.Thumbprint)"
      $store.Remove($cert)
    }
  }
  $store.Close() 

  # Finished
  Write-Log "Finished"
  $Body = $EmailLog | out-string
  Send-MailMessage -SmtpServer $PSEmailServer -From $LocalEmailAddress -To $OwnerEmailAddress -Subject "Let's Encrypt certificate renewed for $domain" -Body $Body
} Catch {
  Write-Host $_.Exception
  $ErrorMessage = $_.Exception | format-list -force | out-string
  $EmailLog += "Let's Encrypt certificate renewal for $domain failed with exception`n$ErrorMessage`r`n`r`n"
  $Body = $EmailLog | Out-String
  Send-MailMessage -SmtpServer $PSEmailServer -From $LocalEmailAddress -To $OwnerEmailAddress -Subject "Let's Encrypt certificate renewal for $domain failed with exception" -Body $Body
  Exit
}

Side note: I discovered it’s important to let ACMESharp do its thing in the script and not try and do anything with it in another process because it tends to fall over with an exception if some other process is accessing its vault when it wants to.

Another minor update (18 Feb 2017): my $alias in my live script happened to be the same as my $domain; if they differed, then the script would fail. The $alias variable is no longer needed and has been removed from the script above. Thank you to BdN3504 for reporting this in the comments!

Yet another update (15 Apr 2018): The $PSEmailServer variable in my script was defined but never used. Send-MailMessage calls updated to use it with -SmtpServer. Thank you to Roger for reporting.


Automating certificate renewal with Let’s Encrypt and ACMESharp on Windows

Jan 2020, please note: This approach is now deprecated. Let’s Encrypt will stop accepting ACMEv1 requests in June 2020. Have a look at https://letsencrypt.org/docs/client-options/ for alternatives to this process.


UPDATE: 10 February 2017! I’ve updated the script in a new blog post to handle identifer expiry. 


Let’s Encrypt is a free, automated, and open Certificate Authority. And it is awesome. It is being used by over 15 million domains already to date.

le-logo-standard

Let’s Encrypt is a certificate authority. So that means that they issue certificates, specifically for secure https (TLS) websites. Lots of other organisations do this as well. But two things stand out about Let’s Encrypt. First, it’s free! Given that I was paying over $100/year for a certificate for one of my sites until recently, that’s a big win already. The second is, it’s automated!

The automated bit cannot be understated. It means that the first time I use Let’s Encrypt, I have to do a bunch of setup. But from then on, I no longer have to remember the arcane and complicated process of generating a certificate request, uploading it to a CA, waiting for the CA to process the request, and finally importing the certificate along with all the incidentals such as intermediate certificates.

However, the one thing about Let’s Encrypt that has stopped me using it so far is that I run some of my sites on IIS on Windows, but Let’s Encrypt is very *nix-focused. While there are clients for Windows, none of them are very complete and so it’s been a bit of hit and miss using them.

The most up-to-date client/library that I have found appears to be ACMESharp. This library is a PowerShell module, and while there is a GUI front end available, I haven’t used the GUI. I’ve worked entirely with the PowerShell module. ACMESharp is pretty flexible and covers everything I need, except one thing: renewals. It has no built-in automated renewal support. So I rolled my own.

I did most of my work in the Let’s Encrypt staging environment, after foolishly starting in the live environment and rapidly hitting the duplicate certificate rate limit. I recommend you do your testing in the staging environment also!

The easiest way to work in the staging environment is to setup a separate vault profile for ACMESharp. I ended up using my :user profile for staging and my :sys profile for the live host. To specify which vault profile you want to use, it’s best to use an environment variable, as otherwise you’ll inevitably forget to append the -VaultProfile parameter to one of your setup commands and leave yourself in a bit of a mess:

$env:ACMESHARP_VAULT_PROFILE=":user"

What follows is a script setup for my servers, but which should work for most Windows PowerShell scenarios. I have set it up to email me on success or failure; I’ll be watching it over the next little while to ensure that it gets things right. I have set it up as a scheduled task to run every 60 days, per Let’s Encrypt’s recommendation.

The script assumes you have already followed the ACMESharp Quick Start to configure your environment. The variables at the top of the script could be configured as script parameters, but for simplicity I’ve just put them at the top of the script. The script will request a new certificate, import the newly issued certificate into the localmachine certificate store, then assign it to all https bindings on the specified web site instance. Finally, it will delete all expired certificates associated with the domain in question.

UPDATE: 10 February 2017! Please see the revised script!

import-module ACMESharp

#
# Script parameters
#

$domain = "my.example.com"
$alias = "my.example.com-01"
$iissitename = "my.example.com"
$certname = "my.example.com-$(get-date -format yyyy-MM-dd--HH-mm)"

#
# Environmental variables
#

$PSEmailServer = "localhost"
$LocalEmailAddress = "[email protected]"
$OwnerEmailAddress = "[email protected]"
$pfxfile = "c:\Admin\Certs\$certname.pfx"
$CertificatePassword = "PASSWORD!"

#
# Script setup - should be no need to change things below this point
#

$ErrorActionPreference = "Stop"
$EmailLog = @()

#
# Utility functions
#

function Write-Log {
  Write-Host $args[0]
  $script:EmailLog  += $args[0]
}

Try {
  Write-Log "Attempting to renew Let's Encrypt certificate for $domain"

  # Generate a certificate
  Write-Log "Generating certificate for $alias"
  New-ACMECertificate ${alias} -Generate -Alias $certname

  # Submit the certificate
  Submit-ACMECertificate $certname

  # Check the status of the certificate every 6 seconds until we have an answer; fail after a minute
  $i = 0
  do {
    $certinfo = Update-AcmeCertificate $certname
    if($certinfo.SerialNumber -ne "") {
      Start-Sleep 6
      $i++
    }
  } until($certinfo.SerialNumber -ne "" -or $i -gt 10)

  if($i -gt 10) {
    Write-Log "We did not receive a completed certificate after 60 seconds"
    $Body = $EmailLog | out-string
    Send-MailMessage -From $LocalEmailAddress -To $OwnerEmailAddress -Subject "Attempting to renew Let's Encrypt certificate for $domain" -Body $Body
    Exit
  }

  # Export Certificate to PFX file
  Get-ACMECertificate $certname -ExportPkcs12 $pfxfile -CertificatePassword $CertificatePassword

  # Import the certificate to the local machine certificate store 
  Write-Log "Import pfx certificate $pfxfile"
  $certRootStore = "LocalMachine"
  $certStore = "My"
  $pfx = New-Object System.Security.Cryptography.X509Certificates.X509Certificate2
  $pfx.Import($pfxfile,$CertificatePassword,"Exportable,PersistKeySet,MachineKeySet") 
  $store = New-Object System.Security.Cryptography.X509Certificates.X509Store($certStore,$certRootStore) 
  $store.Open('ReadWrite')
  $store.Add($pfx) 
  $store.Close() 
  $certThumbprint = $pfx.Thumbprint

  # Bind the certificate to the requested IIS site (all https bindings)
  Write-Log "Bind certificate with Thumbprint $certThumbprint"
  $obj = get-webconfiguration "//sites/site[@name='$iissitename']"
  for($i = 0; $i -lt $obj.bindings.Collection.Length; $i++) {
    $binding = $obj.bindings.Collection[$i]
    if($binding.protocol -eq "https") {
      $method = $binding.Methods["AddSslCertificate"]
      $methodInstance = $method.CreateInstance()
      $methodInstance.Input.SetAttributeValue("certificateHash", $certThumbprint)
      $methodInstance.Input.SetAttributeValue("certificateStoreName", $certStore)
      $methodInstance.Execute()
    }
  }

  # Remove expired LetsEncrypt certificates for this domain
  Write-Log "Remove old certificates"
  $certRootStore = "LocalMachine"
  $certStore = "My"
  $date = Get-Date
  $store = New-Object System.Security.Cryptography.X509Certificates.X509Store($certStore,$certRootStore) 
  $store.Open('ReadWrite')
  foreach($cert in $store.Certificates) {
    if($cert.Subject -eq "CN=$domain" -And $cert.Issuer.Contains("Let's Encrypt") -And $cert.Thumbprint -ne $certThumbprint) {
      Write-Log "Removing certificate $($cert.Thumbprint)"
      $store.Remove($cert)
    }
  }
  $store.Close() 

  # Finished
  Write-Log "Finished"
  $Body = $EmailLog | out-string
  Send-MailMessage -From $LocalEmailAddress -To $OwnerEmailAddress -Subject "Let's Encrypt certificate renewed for $domain" -Body $Body
} Catch {
  Write-Host $_.Exception
  $ErrorMessage = $_.Exception | format-list -force | out-string
  $EmailLog += "Let's Encrypt certificate renewal for $domain failed with exception`n$ErrorMessage`r`n`r`n"
  $Body = $EmailLog | Out-String
  Send-MailMessage -From $LocalEmailAddress -To $OwnerEmailAddress -Subject "Let's Encrypt certificate renewal for $domain failed with exception" -Body $Body
  Exit
}

I guess I’ll find out in 60 days if the script still works! With many thanks to the users of StackOverflow, and other bloggers, for working code samples which saved me a lot of time reading reference documentation for so many of the different bits of glue here, from exception management, through to sending emails with PowerShell, through to assigning certificates to IIS website bindings, and more…

Update 2 December 2016: The original script had a bug that didn’t affect use with IIS. However, when I tried to use the Let’s Encrypt certificate with another program, in this case MailEnable, I found that the program did not have access to the certificate, even though it seemed it should have had.

When I started the relevant MailEnable service, it would display an error such as:

12/02/16 20:13:00 **** Error 0x8009030d returned by AcquireCredentialsHandle
12/02/16 20:13:00 **** Error creating credentials object for SSL session
12/02/16 20:13:00 Unable to locate or bind to certificate with name "my.example.com"

I checked the permissions and various other factors but only when I did a deep comparison of the details of a working certificate against the one that was failing, using certutil, as suggested in that blog linked above, did I spot the problem. The problem lay in the following CRYPT_KEY_PROV_INFO structure:

CERT_KEY_PROV_INFO_PROP_ID(2):
    Key Container = {XXXXXXXX-XXXX-XXXX-XXXX-XXXXXXXXXXXX}
  Unique container name: XXXXXXXXXXXXXXXXXXXXXXXXXXXXXXXX_XXXXXXXX-XXXX-XXXX-XXXX-XXXXXXXXXXXX
    Provider = Microsoft Enhanced Cryptographic Provider v1.0
    ProviderType = 1
    Flags = 0
    KeySpec = 1 -- AT_KEYEXCHANGE

When I compared this against a working certificate, I saw that the Flags member had a value of 20 (hex), not 0. 0x20 turns out to be CRYPT_MACHINE_KEYSET. Because I was missing the MachineKeySet flag in the certificate import call, this meant that the key was stored under the Administrator user’s keyset instead of the machine keyset. IIS coped with this, but not MailEnable, which runs under a more restricted user’s credentials.

I have also updated the script to delete all Let’s Encrypt certificates for the domain that have been obsoleted by the new certificate, rather than just certificates that have expired (-And $cert.NotAfter -lt $date), mostly to avoid the risk of accidentally selecting an old certificate manually when doing configuration via UI.

On my servers, I’ve also added a section to the end of the script that restarts various services that depend on the certificate and will not use a new certificate until after restarting.

Windbg and Delphi – a quick reference

This is a list of my blog posts on using WinDBG with Delphi apps, mostly for my reference. Internally, I use a version of tds2dbg with some private modifications, but you should have reasonable results with the public version.

WinDBG and Delphi exceptions

WinDBG and Delphi exceptions in x64

Locating Delphi exceptions in a live session or dump using WinDbg

Debugging a stalled Delphi process with Windbg and memory searches

Finding class instances in a Delphi process using WinDbg

More windbg tricks with Delphi – how to ignore specific exceptions (Jan 2016)

I also have some other posts that talk about WinDBG and/or Delphi which can be helpful for illustrative purposes:

Another partial malware diagnosis

Detecting the Citadel Trojan with an Application Failure

When characters go astray: diagnosing missing characters when printing with IE9

WaitForSingleObject. Why you should never use it.

IE11, Windbg, JavaScript = joy


The case of the unexplained: When no Windows apps (aka Windows Store apps) will start

Yes, I’m shamelessly stealing @MarkRussinovich‘s blog series title for this post!

One of my machines running Windows 10 here would not run any Windows apps (formerly known as Universal apps, Metro, Modern UI and I’m not sure if I’ve missed any names). Classic desktop apps would work fine.

Finding Microsoft Edge in the Start Menu

I’d click the link to the app in the Start Menu (those missing names may be another case to chase!), and the app would flash onto the screen and then almost immediately disappear.

Microsoft Edge starts and immediately exits

Of course this was more than a little bit frustrating, with no hints as to how to resolve the problem. Checking event logs and reliability provided no pointers towards solutions.

Reliability Monitor is aware of the problem but doesn't know how to fix it

After a couple of pointless web searches (“Edge won’t start”, what was I thinking?), and a bizarre side trip into deep conspiracy theories on Microsoft forums, I realised it was time to break out Procmon to try and trace the problem.

Procmon to the rescue

Procmon lets you watch and log events happening on your file system, registry and network in real time. Running Procmon for even just a minute will often generate hundreds of thousands of events, so it’s fantastic that it includes a powerful set of filtering tools to help you locate specific events.

I started Procmon, and then started, or tried to start Microsoft Edge. After it fell over again, I went back into Procmon, stopped the trace (Ctrl+E), and started to filter the 452,626 events that had been captured in those few seconds.

Initial results in procmon

Procmon’s initial setup includes some filters that exclude events that are of less interest to mere mortals, such as reading and writing to the pagefile, or events caused by Procmon itself. Those default filters cut the results down by 55% to begin with!

While you can use the Filter dialog (Ctrl+L) to manually enter filters, and I often do this for complex filtering, it’s often faster to simply right-click on a cell that you don’t want to see again, and select Exclude <value> from the popup menu. Conversely, if you want to focus on that particular value, select Include <value>.

First, I excluded some processes I wasn’t interested in, such as Explorer.exe, and then excluded a number of different values from the Result column. I was really looking for the ACCESS DENIED result, because that’s probably the most common result that causes apps to crash. I ended up with the following filters on the Result column:

Filtering results to find the errors I am looking for in Procmon

Now, there were few enough events (only 1,625 of them) that I could scan through quickly and hopefully spot something going wrong. And, again Procmon found the answer!

Finding the point where Microsoft Edge encounters an error in Procmon

There you can see MicrosoftEdge.exe receiving an ACCESS DENIED result when trying to read the folder C:\Users\mcdurdin\AppData\Local\Packages\Microsoft.MicrosoftEdge_8wekyb3d8bbwe\AC\Microsoft\Windows\1605653898. Shortly thereafter, we see the WerFault.exe process which is the Windows Error Reporting process that started after Edge decided to crash.

Note: it’s merely serendipitous that WerFault.exe is visible in the filtered results; remember that there are probably thousands of additional events between the highlighted ACCESS DENIED event and the start of the WerFault.exe process, and the only reason it is visible at all is that WerFault itself had received ACCESS DENIED and other results from its own events!

I could alternatively have looked at the process tree (Ctrl+T) to find when the WerFault.exe process started (or the MicrosoftEdge.exe process had stopped) and traced back from there. But usually I find filtering to be a faster way of finding the specific issue.

What’s wrong with this folder?

Now I wanted to figure out what was wrong with this folder. Here’s what I saw on this machine:

C:\Users\mcdurdin\AppData\Local\Packages>icacls Microsoft.MicrosoftEdge_8wekyb3d8bbwe\AC
Microsoft.MicrosoftEdge_8wekyb3d8bbwe\AC NT AUTHORITY\SYSTEM:(I)(OI)(CI)(F)
                                         BUILTIN\Administrators:(I)(OI)(CI)(F)
                                         TAVULTESOFT\mcdurdin:(I)(OI)(CI)(F)

Successfully processed 1 files; Failed processing 0 files

And this is what I saw on a machine where Edge was working:

C:\Users\mcdurdin\AppData\Local\Packages>icacls Microsoft.MicrosoftEdge_8wekyb3d8bbwe\AC
Microsoft.MicrosoftEdge_8wekyb3d8bbwe\AC S-1-15-2-3624051433-2125758914-1423191267-1740899205-1073925389-3782572162-737981194:(OI)(CI)(F)
                                         NT AUTHORITY\SYSTEM:(I)(OI)(CI)(F)
                                         BUILTIN\Administrators:(I)(OI)(CI)(F)
                                         TAVULTESOFT\mcdurdin:(I)(OI)(CI)(F)
                                         Mandatory Label\Low Mandatory Level:(OI)(CI)(NW)

Successfully processed 1 files; Failed processing 0 files

I saw two differences: a missing S-1-15-2-… entry and a missing Low Mandatory Level entry. Now, that S-1-15-2-… entry is an App Package SID. I checked a few other installed app packages, and they were all missing the relevant security settings on this machine. So it wasn’t specific to Edge, but was a general issue on my computer.

At this point, I did find a relevant discussion on Microsoft’s forums that had some answers, but did not solve the general case that I was experiencing.

I  have not been able to find the root cause of this. Lost in the deep dark mists of time it is.

Fixing the problem

To fix the Low integrity level was a pretty straightforward command, run from a command prompt in the %LOCALAPPDATA%\Packages folder:

for /d %d in (*) do icacls %d\AC /setintegritylevel (OI)(CI)L

However, determining the correct SID to add to each folder was a little more work. It turns out that in the registry, there is a mapping between the app’s moniker (so, in this case, the folder names) and the relevant SID at HKEY_CLASSES_ROOT\Local Settings\Software\Microsoft\Windows\CurrentVersion\AppContainer\Mappings. Learn more.
The AppContainer Mappings registry, showing the relationship between SID and Moniker
I sucked a list of those SIDs into a text file with the following command:

reg query "HKCR\Local Settings\Software\Microsoft\Windows\CurrentVersion\AppContainer\Mappings" > m.txt

That gave me a file that looked like this, shown as an image just because:

The contents of m.txt

From there, I wanted to extract just the last part of each key:

for /f "tokens=9 delims=\" %i in (m.txt) do echo %i >> n.txt

Now n.txt looked like:

The contents of n.txt

Now to take each of those and map it to its moniker, and from there update the security on the folder accordingly. That command turned out to be a bit more hoopy.

for /f %a in (n.txt) do for /f "tokens=2*" %b in ('reg query "HKCR\Local Settings\Software\Microsoft\Windows\CurrentVersion\AppContainer\Mappings\%a" /V "Moniker" 2^>NUL ^| FIND "REG_SZ"') DO icacls "%c\AC" /grant *%a:(OI)(CI)(F)

Putting that all together, in a batch file (I’ve combined the integrity level setting and SID grant in this script):

@echo off
del n.txt
reg query "HKCR\Local Settings\Software\Microsoft\Windows\CurrentVersion\AppContainer\Mappings" > m.txt
for /f "tokens=9 delims=\" %%i in (m.txt) do echo %%i >> n.txt
for /f %%a in (n.txt) do for /f "tokens=2*" %%b in ('reg query "HKCR\Local Settings\Software\Microsoft\Windows\CurrentVersion\AppContainer\Mappings\%%a" /V "Moniker" 2^>NUL ^| FIND "REG_SZ"') DO icacls "%%c\AC" /grant *%%a:(OI)(CI)(F) /setintegritylevel (OI)(CI)L

And yay, now Edge starts!

Yay, Microsoft Edge starts now!

One of these days I’ll have to get more into PowerShell, which would probably make some of these scripts a lot easier!

With thanks to examples from http://www.robvanderwoude.com/ntregquery.php which saved a lot of fuss (but warning if you copy and paste: the examples use the wrong caret character, ˆ instead of ^).

GUI Info Utility for Windows

A very quick one today. GUIInfo is a tiny little utility that has a narrow purpose: it shows, in realtime, the current active, focus, foreground and capture window information for Windows.

Why this utility? Debugging focus issues is always frustrating. Attempting to observe current window focus information in a debugger results in the focus changing (to the debugger, of course). You can work around this – use remote debugging, or add logging in the debugger – but it’s a hassle.

Debugging focus issues would make Werner Heisenberg feel right at home.

Screenshot

GUIInfo Screenshot

Features

  • Updates 10 times a second so changes are reflected promptly.
  • Changes are highlighted in green, and slowly fade back to black.
  • Hovering over bold window labels will highlight the relevant window on the screen.
  • Topmost, so you can see the information without needing to try and keep the window visible.
  • Open Source – written in Delphi, MIT license.

Download and Source

The case of the UAC that Just Wouldn’t

One of my dev machines has long had a weird anomaly where file operations in Explorer that should prompt for UAC, such as copying a file into C:\Program Files, would instead silently fail.

This led to all sorts of issues, from being unable to delete certain files — they’d just obstinately sit there, no matter how much I pressed that Del key — to trying to move folders containing a hidden Thumbs.db file and being unable to move the folder.

My UAC settings were the Windows defaults. Nothing weird these. So I’d always treated put this issue into my “too busy to solve this now” basket. The classic basket case. But today I finally got fed up.

After a quick search for the symptoms on Dr Google returned no results of significance, I decided I needed to trace the cause myself.

Process Monitor to the Rescue

It was time to pull out Process Monitor out of my toolbox again! Process Monitor is a tool from the SysInternals Suite by Microsoft that monitors and logs details on a bunch of different operations on your computer. I use Process Monitor, Procmon for short, all the time to solve problems big and little. But for some reason, it hadn’t crossed my mind until today that I could apply Procmon to this problem.

First, I configured Procmon to filter all events except for those generated by Explorer.exe and Consent.exe. I wasn’t sure if Consent.exe was involved in the problem (Consent.exe being the UAC elevation prompter), but it wouldn’t hurt to include it to start with. Note that all those Exclude filters are default filters setup by Procmon to exclude itself and its friends, removing that confusion from the logs.

Procmon filter

Then I went ahead and tried to copy a file into C:\Program Files (x86). It was just an innocent little text file, but Explorer of course acted like a Buckingham Palace Guard and silently and stolidly ignored its existence.

Source folder  ➔  Dest folder

I used the clipboard Ctrl+C and Ctrl+V to copy and paste (or attempt to paste) the file. I didn’t think the clipboard was at fault because all other UAC-required file operations also failed silently. I could have dragged and dropped, it would have had the same effect.

But now, with procmon, I had captured the communication that went on behind the scenes. All those secret coded winks and nose scratches that told Explorer to fob off any attempts to trigger a UAC prompt. Here’s what I was presented with in the Procmon log.

Procmon start

I searched for the name of my text file (test.txt), and used Procmon’s Highlight tool to highlight every reference to it in the Path column. This made it easy to spot nearby interactions that may have been related, even if they didn’t directly reference the test.txt file itself. You can see below two of the highlighted test.txt lines.

Procmon highlighting

Because there was a lot going on, I filtered out a lot of Operations that I thought were not relevant, such as CloseFile, RegCloseKey, RegQueryKey, ReadFile and WriteFile, among others. This reduced the log considerably and made it easier to spot differences (my screen capture below shows the filtering after it was reset, however — I forgot to capture the filtered trace, sorry).

I decided to also capture a trace on a machine where UAC prompting worked. I then compared the two logs. After scrolling back and forth around the many references to test.txt, I saw that on my dev machine, there was an additional interaction, right before the point where the prompt dialog was presented:

TortoiseShell in Procmon

That’s right, I had a program called TortoiseCVS installed on this machine which hooked into Explorer in a variety of ways. After the FileOperationPrompt references on my second machine, there was no reference to TortoiseCVS. Here’s what it looked like on the other machine:

Procmon on clean machine without TortoiseShell

That was the only visible difference of significance in the logs.

Now for those of you who just knee-jerked into “why on earth are you using CVS?!?”, calm down! This is a story, and I’m telling the story.

I decided that I didn’t really need TortoiseCVS installed and decided to try uninstalling it.

Uninstall Tortoise CVS

Sadly, uninstalling it required a reboot, no doubt to remove its old fashioned hooks into Explorer.

After the reboot, I tried to copy my innocent little text file again.

CopyWorks

Success! I was now presented with the prompt I wanted!

Another case closed thanks to SysInternals Suite and Mark Russinovich!


A deep dive into Periscope – and how to save the stream from the website

So, yesterday I gave a presentation (the title isn’t important, but it was called “Internationalization Done Wrong”) at WebDev42°, our local web developer meetup (42°S is the latitude of Tasmania). Before the presentation, I tweeted out to see if anyone was interested in doing a Periscope of the talk.

What is Periscope? It’s Twitter’s live video streaming platform, which makes it easy for anyone to live stream events, walks on the beach, or pretty much anything.

After the usual Twitteral conversation, Casey happily agreed to take on the job of cameraman.

And we were set to go. I told my friends on Twitter that I would be presenting at 6pm and would be experimenting with Periscope. A couple of them decided to try and watch.

Here’s what we learned.

The basic experience is really smooth

The premise of Periscope is anyone can host a live stream. That’s definitely true: setup was trivial and getting started was a matter of pressing the Broadcast button. And following the stream on other devices also worked pretty well. At least for mobile devices; not so much for desktops…

People will watch immediately

All sorts of strange people started watching, making helpful comments like “that guy has no hair” and “how come so many of you have beards?” and weird questions about Tasmania.

That strangers came to watch frankly surprised me, because we were a bunch of computer geeks talking about computer geekery, and that’s not really that interesting.

Keep your periscopes focused

I tweeted a link to the Periscope and a couple of my friends jumped on to watch almost immediately. This was unfortunate, because they ended up being put through 20 minutes of talk about beer and hair before the presentation started.

So start a periscope for general chat before the main event if you like, but start a new one for the presentation.

Turn off notifications and all the jazz on your phone

Notifications are seriously loud for the poor viewers of the video!

Talk loudly

I apparently talked too quietly for some of the periscopees (aka viewers).

Take your finger off the microphone

Yep. That’s an effective way to mute the stream. Speaking from experience here. (Suggested by @johndalton).

Name your periscopes

It wasn’t clear to people jumping into the stream what the event was all about. The name should probably have been “Web Dev 42 South Meetup – General Chat” for the first three periscopes (more about that in a moment). Then a new periscope should have been started for each presentation given.

As it turned out, a new periscope was started for each presentation, kinda, but not on purpose (learn why soon). And I only ever shared the link to the first periscope, so my friends were left trying to find the new streams (some of which ended up coming from different users as well).

And locate your periscopes

Updated 10:50pm: As Masni wrote on Twitter, turn on location so people can find your streams.

The Android client is kinda buggy

Yeah, that’s why we had three periscopes even before the event officially started. It’s because the Android client kept crashing. We finally switched to an iPad, but not before losing the last few minutes of my talk. (Not a big loss, to be sure!)

The iPad was much more stable.

The cameraperson probably needs to be an extrovert

So Casey is really not an introvert, which is good, because I would be too shy to run around filming people. He did a good job of that, even through all the chaos.

Share your periscopes

I got kinda busy after tweeting out the first link, so I didn’t really realise that the app had crashed and that everyone was having to find a new stream to follow. It definitely made things more complicated. If you are going to be doing a presentation, try and get someone else to look after tweeting out live things like that on your behalf. They probably won’t steal your phone or tweet anything too embarrassing.

Quality is variable

Because it’s a live stream, little network hiccups do sometimes happen. Audio disappeared for something like 30 seconds on one stream (no idea why). The video quality is not awesome but it’s certainly watchable. It’s like Youtube 2003 (was Youtube around in 2003?)

So all those little things aside, the general experience was still pretty cool. Definitely an easy way to share a video!

After the event

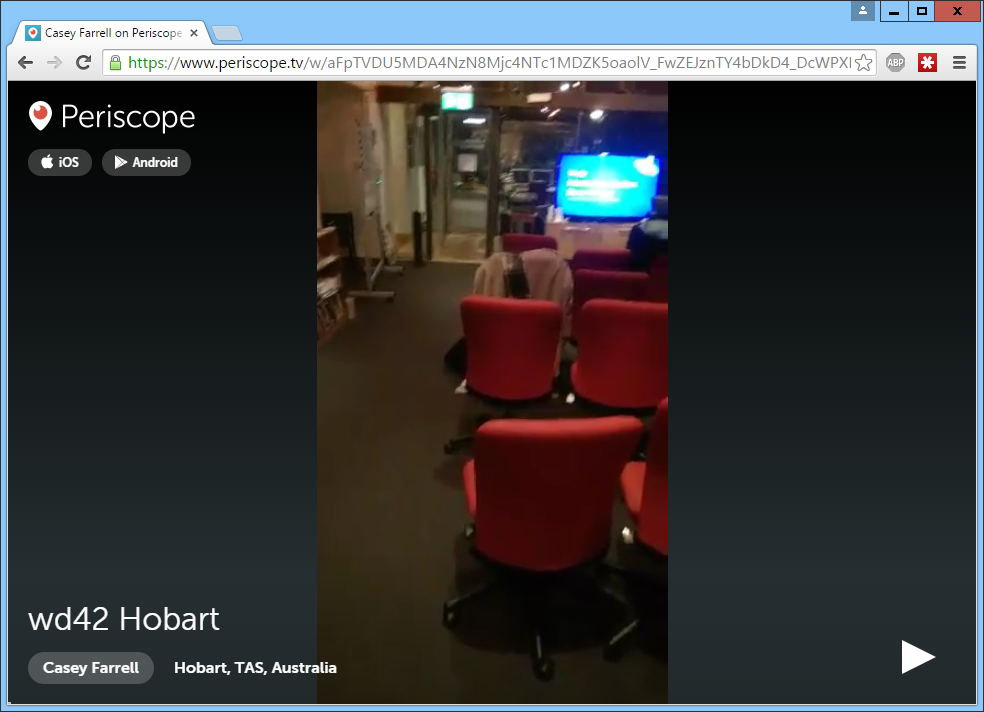
After complaints from my friends and rude comments from the audience, I realised I wanted to review my presentation efforts (i.e. the video) online. This ability to watch a saved stream later was one of the key reasons I chose to try Periscope over Meerkat (a very slightly older competitor).

How did that go?

The post-event experience is pretty minimal

Even though streams are saved so you can watch them asynchronously, the experience is pretty minimal.  There is precisely one control: the play/pause button. That’s right, no fast-forward, no rewind, no skip, no ability to move to a specific point in the stream.

I was faced with watching 20 minutes of discussion about beer and hair just so I could review my presentation!

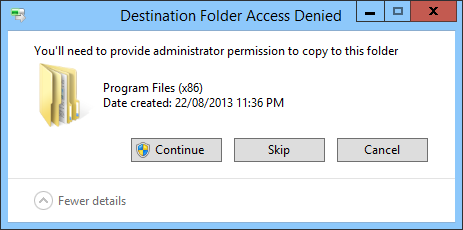
The website is a bit buggy

I frequently had trouble starting streams, and more than once a stream would fall over after a few minutes – and the only way to resolve this is to start again with a refresh (ouch!)

Looking at the situation with the Web Developer console, it appears that stream data requests were sometimes being denied with 403 errors. I didn’t dig into why, but that’s a bit of a deal-breaker.

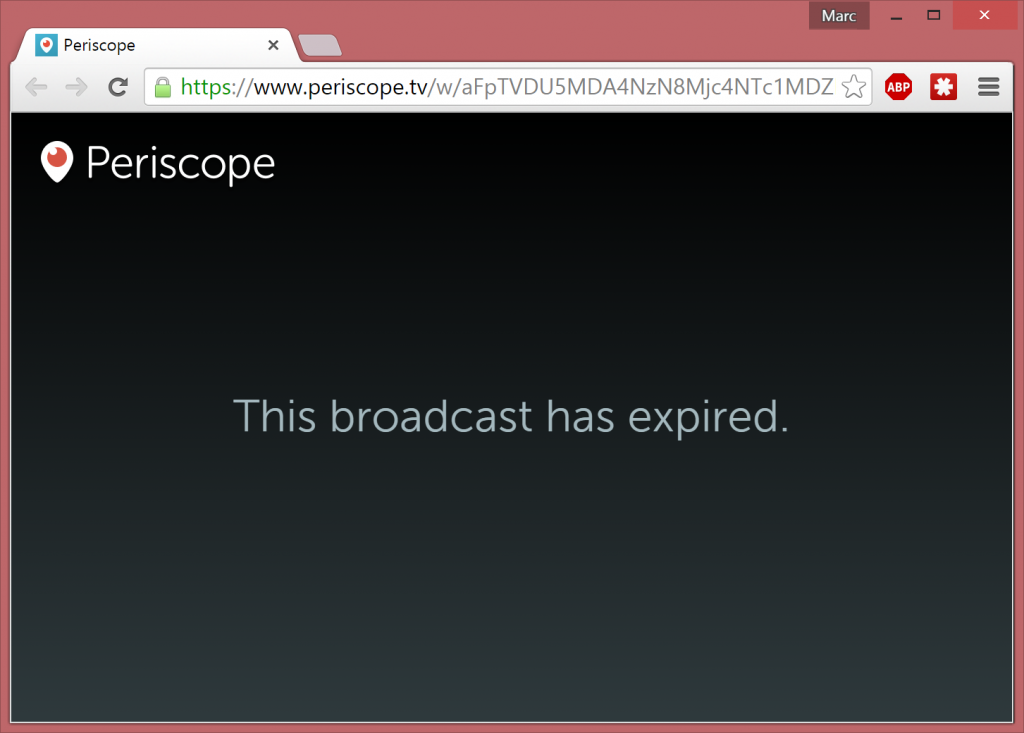
You can only watch for 24 hours

After 24 hours, the public link is gone.

The broadcast has expired

Now, you can save the stream onto your device, if you (a) remember to do that, and (b) have enough storage left. You can choose to have all streams saved by default, which does mean that point (b) would quickly become a truism!

Saving a Periscope Stream from the website

I still hadn’t managed to get further than 4 minutes into my presentation without the site throwing an error. So, after refreshing, and realising I’d have to sit through three minutes of pre-talk setup yet again, because no fast forward, remember (this was like the 4th periscope start after the Android crashes, so I could at least skip the first 17 minutes), I gave up on watching online. Instead, I decided to try and find a way to save the stream.

And I found my way through it! 🙂  And if I can do it, I’m sure you can.

Caveats apply here. You may not have permission to copy a stream because it is copyright and all that. Be good. They may change the website back-end and you’ll have to adapt with the changes. Remember this will only work in the first 24 hours after the event.

So here’s how you do it. I haven’t automated this (much) because that’s for someone else to do, later.

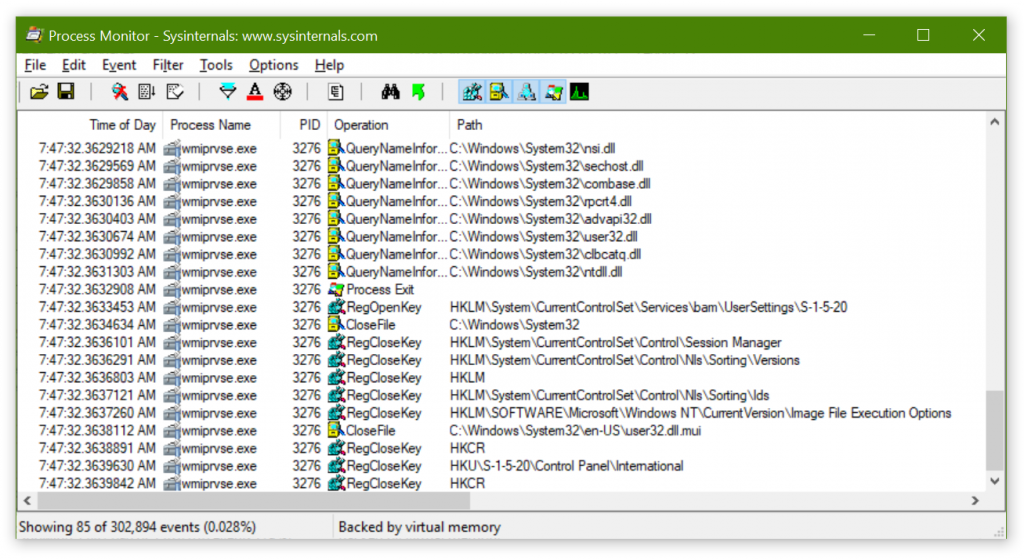
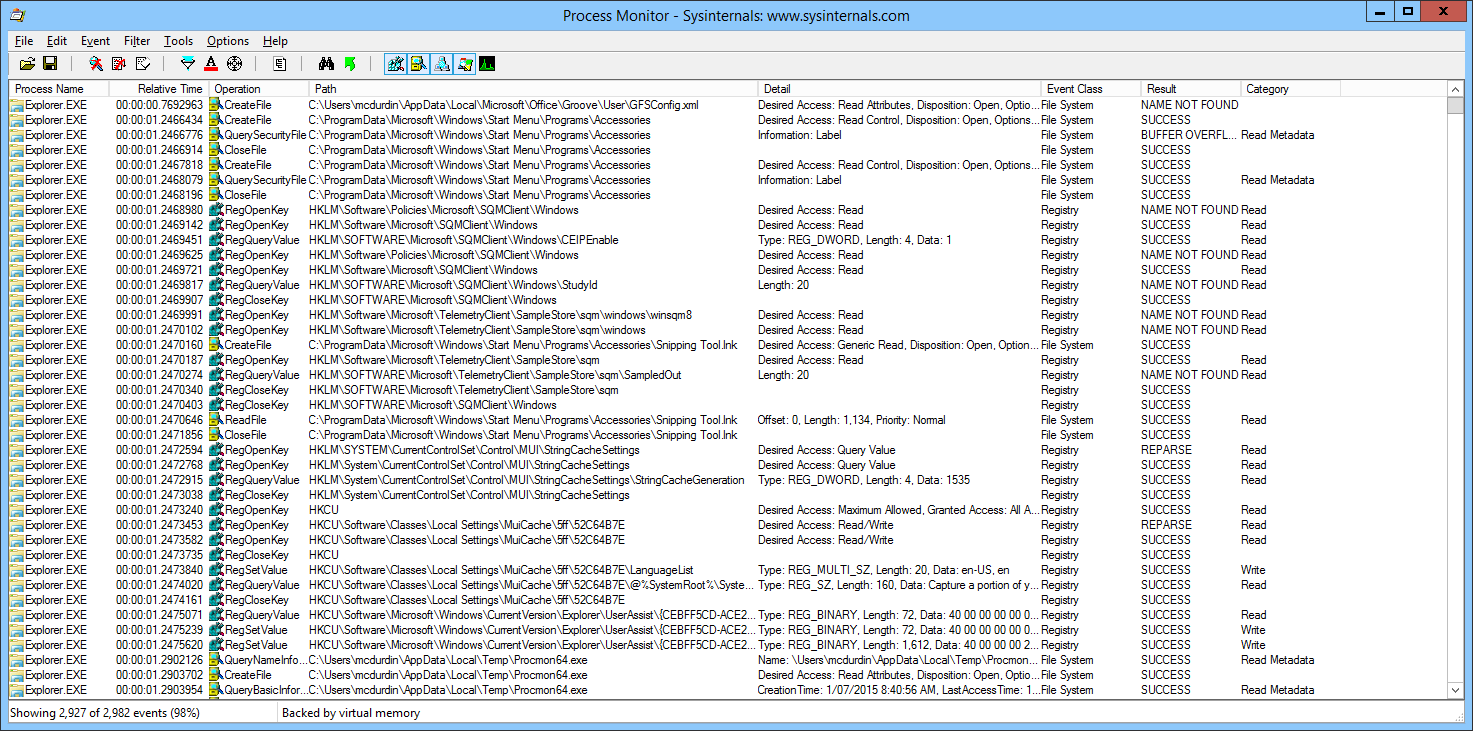
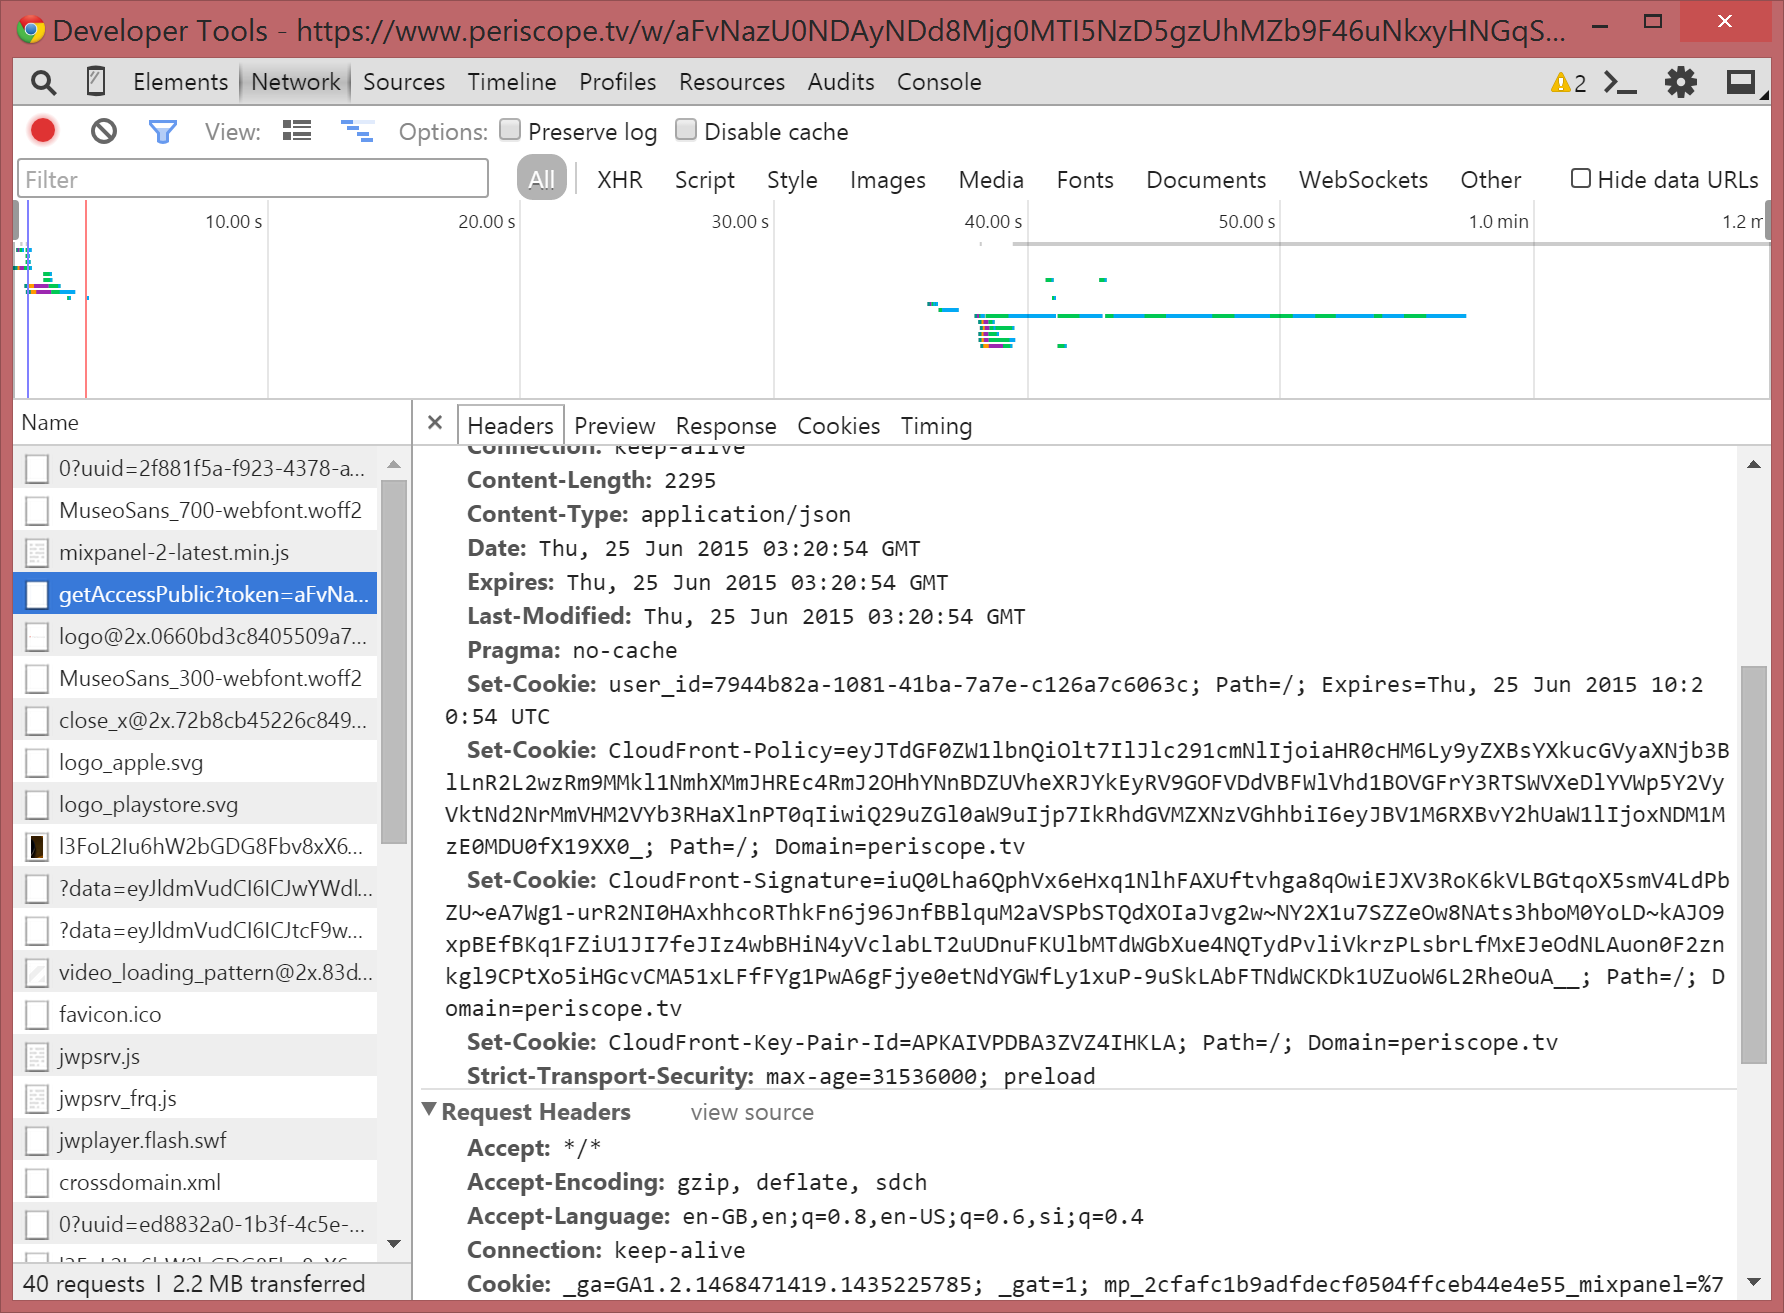
Visit the Periscope URL with Web Developer open.

I used Chrome but you can use pretty much any browser. We want to capture the network traffic to find the access token for the stream, so we can grab it with a tool.

The Periscope page

Once the page loads, look for the getAccessPublic request, as shown below.

We’re going to want two different things out of that.

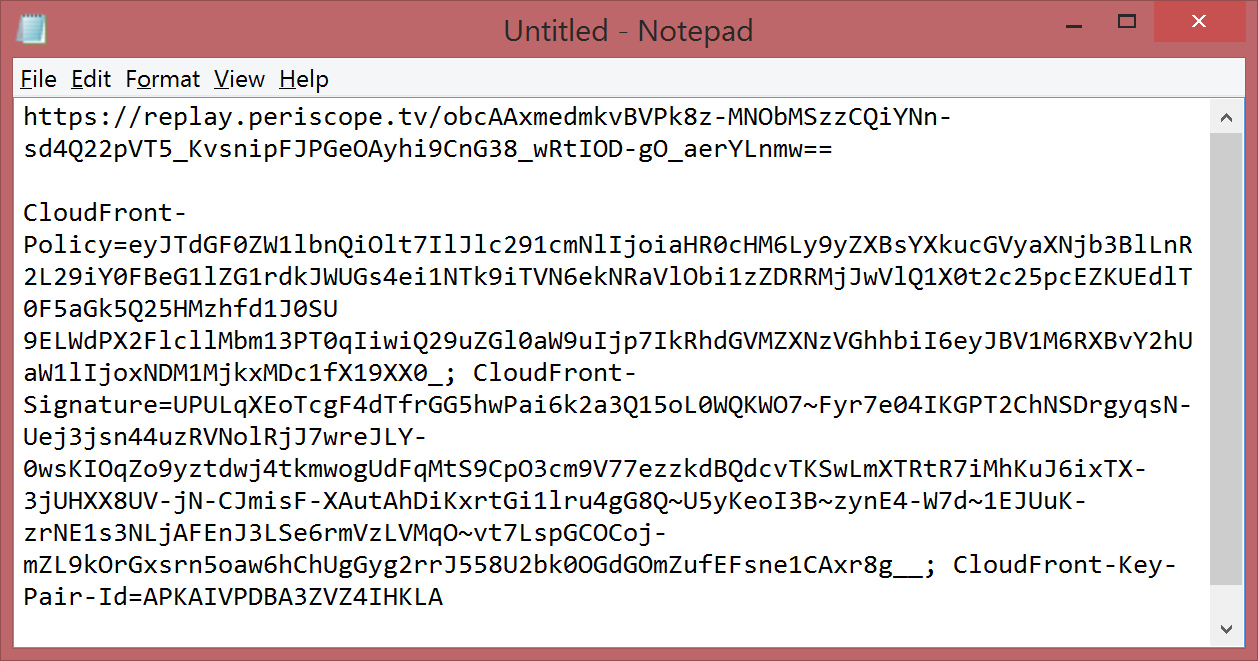
  • The replay_url, shown most easily in the Preview pane. Copy it to the clipboard and paste it into a document for later.

replay_url in the response

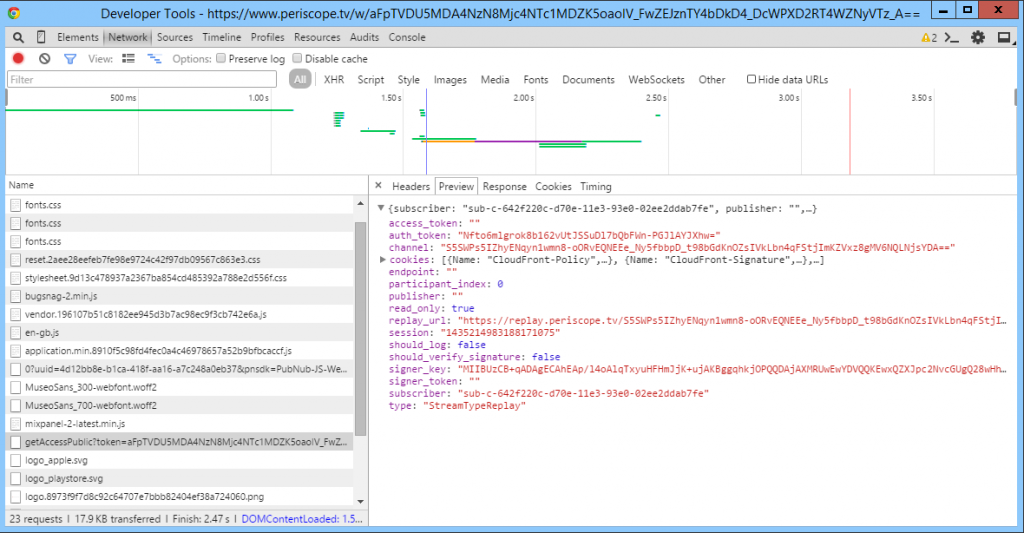
  • And the cookies. These are easier to copy from the Headers pane (Sorry, this is a later screenshot, but the principle still applies.).

Cookies in the Header pane


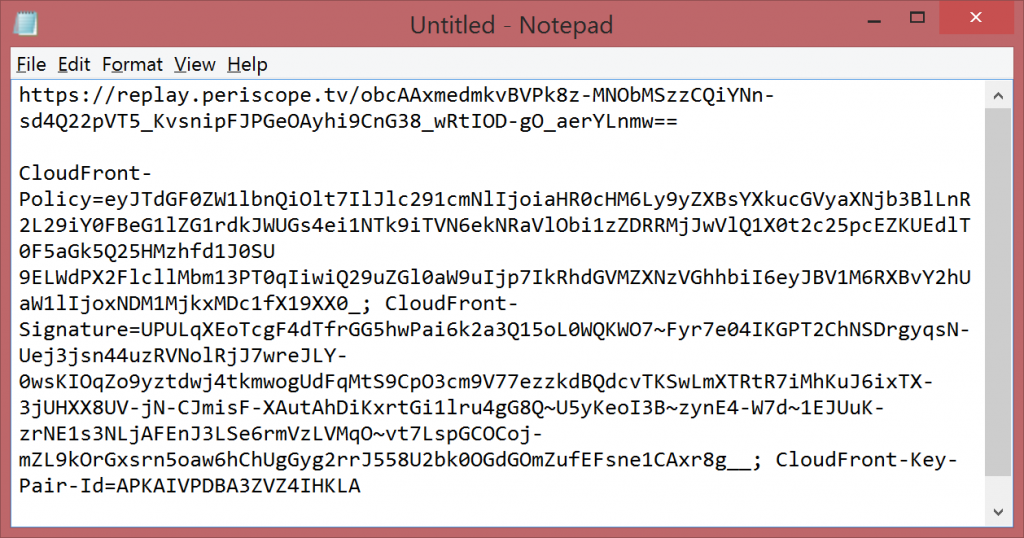
You’ll need to copy the value of each Set-Cookie header, up until the first semicolon (;). Don’t include the “Set-Cookie” text itself. Paste these into a text document, separating the strings with semi-colons. Don’t add line breaks.

When you are done, you should have something like this (no line breaks, just automatic wordwrapping showing here):

Preparation - URL and Cookies


The replay url will point to a path on a web server that contains a m3u8 format playlist file, and a set of MPEG-2 TS video files, which represent your video stream broken down into chunks.

Create a batch file to download the video

Now, we want to pass those variables you collected into a batch file, for simplicity. I used the tool wget to download the files from the command line.

Here’s the batch file code.

@echo off

set cookie="Cookie: <your-cookie-text-here>"

set url=<your-replay-url-here>

wget --no-cookies --header %cookie% --no-check-certificate %url%/playlist.m3u8

findstr "chunk" playlist.m3u8 > downloadlist.txt

for /f %%i in (downloadlist.txt) do wget --no-cookies --header %cookie% --no-check-certificate %url%/%%i

Replace the <your-cookie-text-here> and <your-replay-url-here> placeholders with your variables collected earlier. This script will download the playlist.m3u8 file, using the correct access permissions, and parse out the chunks of your video from that (pretty simple) file format into a download list. Then, it goes through the download list and downloads each chunk. Pretty straightforward.

(Why –no-check-certificate? Because the default root certificate list that comes with wget is out of date!)

Save and run the batch file.

It may take a little while to run, but after a bit, you’ll have collected all the different bits of your video for posterity onto your machine. The whole download took about 15 minutes on my 100mbit NBN link, which suggests that Periscope may be limiting the bandwidth of each user. No biggie, I went to lunch anyway.

By the time you get back from lunch, the video will be on your computer in hundreds of chunks, each between roughly 100KB and 300KB.


Video files

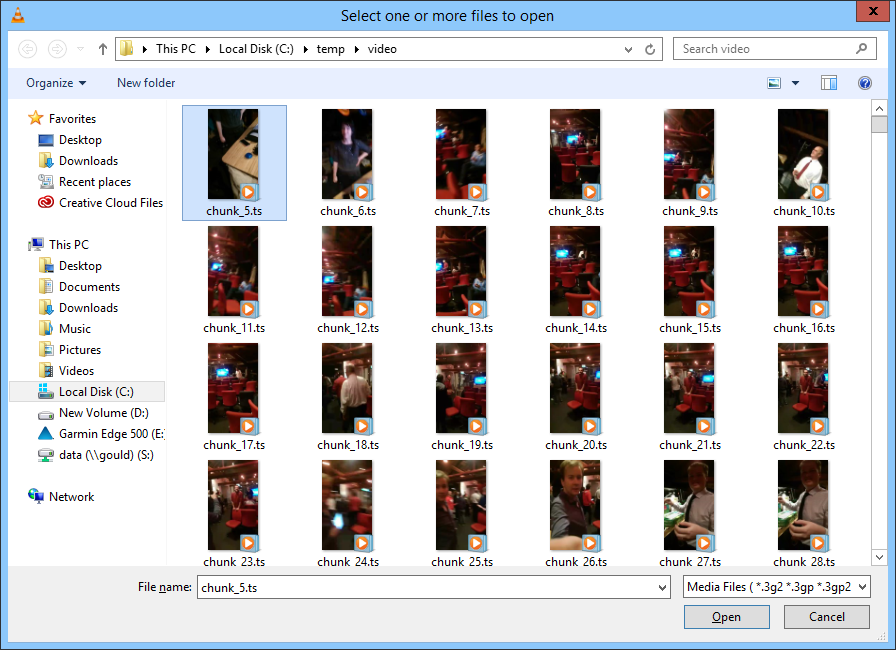
This is no fun. Some video players will load the playlist file and work through the chunks (e.g. VLC), but most of them stutter between the different chunks, which is pretty unwatchable. And it’s a pain to manage.

Combine the chunks into an mp4 video

So I wanted to combine those chunks into a single file for a smooth video experience. I used ffmpeg, which is the most powerful way to do conversions of weird and wonderful video file formats.

To convert these files, this is the command I ended up using (YMMV with that audio conversion parameter, which I didn’t really dig into):

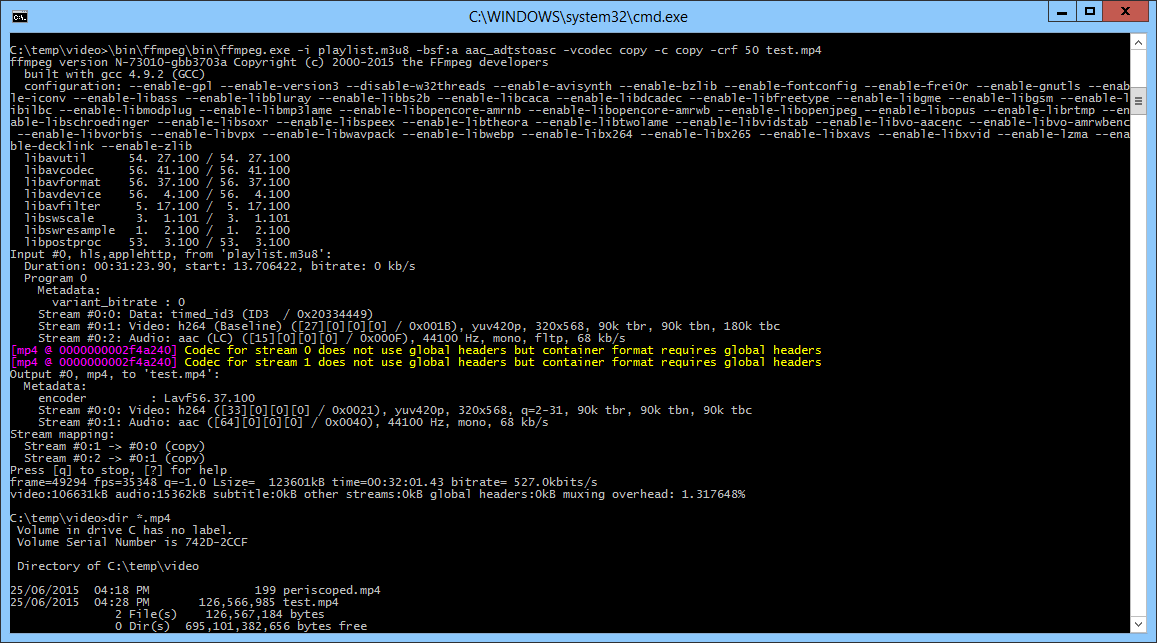
ffmpeg.exe -i playlist.m3u8 -bsf:a aac_adtstoasc -vcodec copy -c copy -crf 50 test.mp4

And here’s what I saw:

ffmpeg commandThe good news is that test.mp4 was generated in 2 seconds flat, and plays without stutters!

Fix the audio sync

But I found that the audio was almost exactly 2 seconds ahead of the video, which made things seem pretty weird. ffmpeg to the rescue again!

ffmpeg.exe -i test.mp4 -itsoffset 2 -i test.mp4 -map 0:0 -map 1:1 -acodec copy -vcodec copy test2.mp4

This command breaks apart the audio and video streams, then takes the audio stream and pauses it for two seconds, before recombining it with the video stream. This blog post explains the details of this trick.

Trim the video

Finally, I wanted to save my viewers the agony of watching the camera setup and preparation for the presentation. It was amusing at the event but not so much when sitting at a computer waiting for the real thing to start! So again, ffmpeg made this easy:

ffmpeg.exe -ss 00:02:45 -i test2.mp4 -acodec copy -vcodec copy final.mp4

And now we have a final.mp4 video, which works beautifully.

Final video in VLC

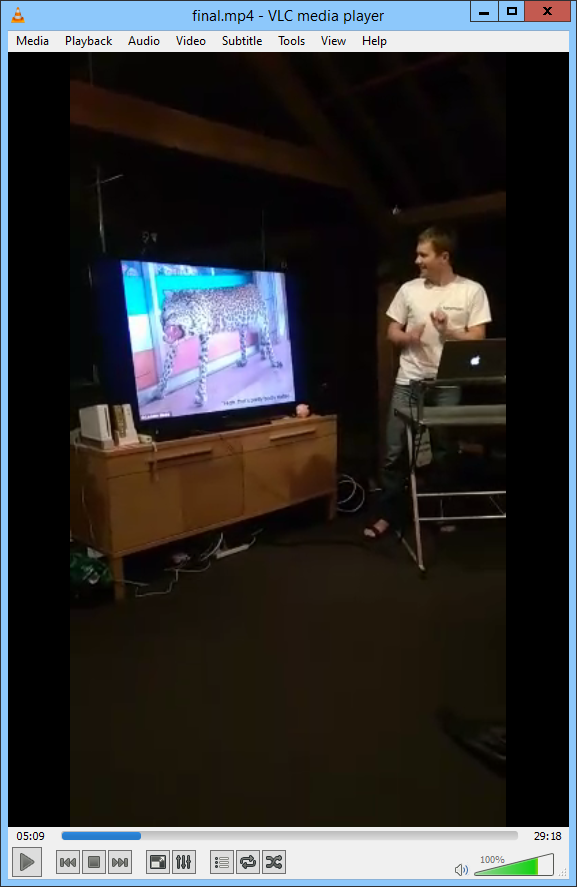
Shame about the guy in the video.

If you do actually want to watch my presentation, you can see all but the last two minutes on Youtube!


Extending $resource in AngularJS

I’ve recently dived into the brave new world (for me) of AngularJS, for a development project for a client. I always enjoy learning new tools and frameworks, especially when there are good design principles and practices that I can apply to both the new project and filter back into existing code.

In this project, we have an existing backend that is delivering data through a RESTful JSON interface. And this is what $resource was designed for. The front end is a HTML document embedded in an existing thick-client application window. Yes, this is the real world.

The data returned by $resource can be either a single item, or an array of items — a collection. $resource automatically wraps each item in the array with the “class” of the single item, which is nice. This makes it trivial to extend items with helper functions, such as, in my case, a time conversion function for a specific field in the JSON data (pseudocode):

angular.module('appServices').factory('Widget', ['$resource',
  function($resource) {
    var Widget= $resource('/data/widgets/:widgetId.json', {}, {
      query: {method:'GET', params:{widgetId:''}, isArray:true}
    });

    Widget.prototype.createTimeInMinutes = function() {
      var m = moment(this.createDateTime);
      return m.hours()*60 + m.minutes();
    };
    
...

However, finding a way to extend the collection was also of interest to me. For example, to add an itemById function which would return a single item from the array identified by a unique identifier field. This is of course me applying my existing object-oriented brain to a Angular (FWIW, this post was the best intro to Angular that I have found, even though it’s about coming from jQuery and not from an OO world).

It seemed nice to me to be able to write something like collection.itemById(), or item.createTimeInMinutes(), associating these functions with the data that they manipulate. Object orientation doing what it does best.  While I was aware of advice around the dangers of extending built-in object prototypes — monkey-patching, I really wasn’t sure that the same concerns applied to extending an ‘instance’ of Array.

There were several answers on Stack Overflow that related to this, in some way, and helped me think through the problem. I (and others) came up with several possible solutions, none of which were completely beautiful to me:

  1. Extend the array returned from $resource.  This is actually hard to do, but in theory possible with transformResponse. Unfortunately, because AngularJS does not preserve extensions to Array objects, you lose those extensions very easily. I won’t add the code here because it is ultimately unhelpful.
  2. Wrap the array in a helper object, when loading in the controller:
    Resource.query().$promise.then(function(collection) {
      $scope.collection = new CollectionWrapper(collection);
    });

    This worked, again, but added a layer of muck to every collection which was unpalatable to me, and pushed implementation into the controller, which just felt like the wrong plce.

  3. Add a helper object:
    var CollectionHelper = {
      itemById = function(collection, id) {
        ...
      }
    };
    
    ...
    
    var item = CollectionHelper.itemById(collection, id);

    Again, this didn’t feel clean, or quite right, although it worked well enough.

  4. Finally, James suggested using a filter.
    angular.module('myapp').filter('byId', function() {
        return function(collection, id) {
          ...
        }
      });
    
    ...
    
    var item = $filter('byId')(collection, id);
    // or you can go directly if injected:
    var item = byIdFilter(collection,id);
    // and within the template you can use:
    {{collection | byId:id }}
    

This last is certainly the most Angular way of doing it.  I’m still not 100% satisfied, because filters have global scope, which means that we need to give them ugly names like collectionDoWonk, instead of just doWonk.

Is this the best way to skin this cat?

Cursor Keys Have Not Improved

I’m a keyboard guy. And I think keyboards suck. In fact, I wrote about this before

I found two new ugly specimens for today’s little rant, and your perusal. Both these keyboards have a reasonably traditional layout, but both fail, for different reasons. These two keyboards were in our conference room.

Microsoft Wireless 800

What’s wrong with this?

  1. It has no gaps between the different parts of the keyboard. Muscle memory fail.
  2. It has a bizarre scooped out shape, not really visible in the photo, which seems to encourage pressing the wrong row of keys.
  3. It has no gaps. This is so bad that it bears repeating. Without gaps, you have to look for the key because you can’t feel for it. Every time.

I thought I was the only one who really hated this keyboard with a passion, but enough other people complained about it that we replaced it with a Dell keyboard. I don’t know what has happened to the Microsoft keyboard. It’s entirely possible someone burned it.

Dell Latest

So this one, at first glance, improves on the Microsoft keyboard by reintroducing that classic design feature: white space, or black space. Just space. Y’know, gaps between different parts of the keyboard. Space is not entirely at a premium on our conference room table. But:

  1. The keys are modern funky flat keys with an unsatisfying deadness to them.
  2. The wrong size! Little tiny navigation keys for big fingers.
  3. And the media keys are encroaching on the navigation key space.
  4. What is the Clear key for? And what have you done with Num Lock? And Scroll Lock? And Pause/Break?
  5. I have nothing against the moon, but why do we need a moon key on our keyboard?

These things cost us time and productivity. It may seem minor, but moving between keyboards has become a constant frustration. I wish we as an industry could do better.